
How to Choose the Right Pot: A Guide to Repotting Houseplants
You might be feeling pretty confident in your houseplant prowess, but many of us who are new to the world of plants hesitate when it comes to repotting for the first time. How to choose the right pot and making the switch can seem daunting as you realize how many variables there are to consider (or how one wrong move could mean the demise of your happy plant).
Daunting though it may be, repotting is an important skill for any gardener (indoor or out) and like many things in life, simply requires gentle confidence, common sense, and a little know-how.
In this guide to repotting, we’ll help you master a few basic concepts that will help you figure out how to choose the right pot for your plant every time.

How to Choose the Right Pot
When is it time to repot?
When do you know your plant is ready to be repotted? If it’s been in the same container for years, it’s definitely ready for a new pot (or at least a root checkup). Some common signs that a plant needs more room or fresh soil nutrients are:
- A noticeable decrease in soil level or quality (soil level has dropped over time or appears dry and hardened)
- Roots visibly growing out the bottom of the pot, top edges of the pot, or busting through the pot
- Plant dries out suspiciously fast, needing more water than it used to (or water runs right through pot, not seeming to saturate the soil)
- Plant is obviously top heavy or awkwardly big for its pot without any surface area for new growth
Most plants will need to be repotted once a year, although some slow growers might just need a topdressing (a few inches of fresh soil on top of the old) to keep them going. Springtime is the best time to repot. Plants are emerging from their winter dormancy and are hungry for fresh nutrients and more room to grow. It’s also warm and bright which means that soil will dry out quickly between waterings (which is important after repotting to avoid root rot).
If you miss spring, summer is still a good time to repot your houseplants, but avoid very hot, dry days when plants may already be stressed and have a hard time adjusting. Autumn and winter are less ideal because your plants are dormant (or going dormant), which basically means that they’re hibernating and would really rather not be disturbed. In winter, even the moisture in fresh soil can overwhelm some plants and cause root rot.
A common misconception is that a stressed plant should be repotted for a pick-me-up. In some cases such as extreme overwatering, certain pests and fungal issues, or if the plant is actually potbound (in need of fresh soil and a bigger pot) this is true, but in many instances repotting a stressed plant will only stress it further. Repotting is a big change for a plant and its delicate root system and should only be done when absolutely necessary.
Won’t a larger pot help your plant grow big and strong?
When determining how to choose the right pot for your houseplant, a key consideration is the size of the new container relative to the old.
A common myth is that plants will grow larger if potted in a larger pot, like a goldfish in a fishbowl. This seems logical, but actually most houseplants prefer a snugger fit. Roots do not quickly fill a space when given room, but rather grow when and where they want to, usually rather slowly. When you repot into a much larger container, the roots are surrounded by soil and can’t pull the water from it fast enough, leaving it wet too long and drowning the roots. A smaller amount of soil dries out more quickly and allows more oxygen to reach the roots, which they need to survive.
For these reasons, you want to size up just a few inches at a time. Most pots fit loosely into a system used in the horticulture industry that goes by 2s: 2 inches, 4 inches, 6 inches, 8 inches and up. These may or may not be the exact measurements, but most pots are grouped into these categories.
This means that if you have a pot that’s approximately 6 inches wide, you will probably be looking to size up to an 8 inch pot. It can be a good idea to know the measurements of your current pots and bring a measuring tape when shopping for pottery. Many nursery and garden center workers are very knowledgeable and happy to offer repotting advice if you need help selecting some options.
Drainage Demystified
Some pots have holes at the bottom and some don’t. When you’re anxious to get your plant into something practical that looks good, these details can seem unnecessarily complicated but it behooves every indoor gardener to learn how drainage works and how this might affect their preferences in pottery.
Simply put, a pot with drainage (holes) is almost always the better option for plant health than a pot with no drainage (no holes). That’s not to say you can’t pick a pot without drainage, but if you’re a beginner puzzling over how to choose the right pot, drainage holes will definitely simplify your care regimen.
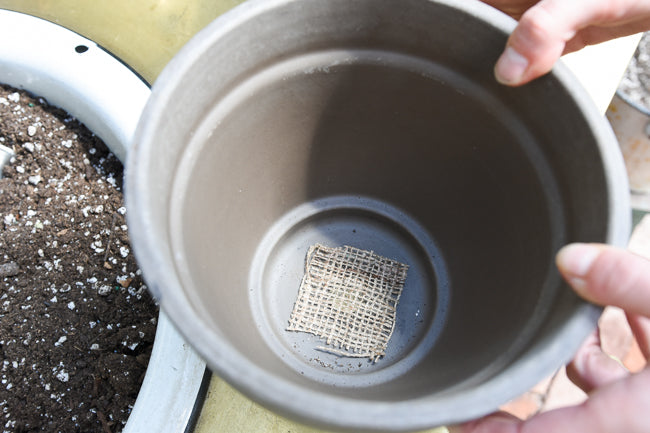
Covering a drainage hole with a piece of burlap or cheesecloth helps keep soil in, without inhibiting drainage.
A pot with drainage allows excess water to flow through the roots and out the bottom instead of settling in the bottom of the pot where it can quickly cause fungal issues or root rot. We prefer to call these pots without drainage cachepots and recommend using them decoratively by resting a plastic nursery pot (with drainage) inside. If the sight of plastic bothers you, you can use Spanish or sphagnum moss to cover any gaps or edges. Most nurseries carry plastic liners if you want to protect the interior of your pot or basket.
Why are there so many pots without drainage? For one thing, gardeners long believed the myth that lining a pot with pebbles or shards of clay was just as good as true drainage. This has since been debunked by numerous sources including Washington State University and Fine Gardening, but the myth persists.
That having been said, some people really prefer the option of a pot without drainage and have a knack for knowing when and how much to water. Tending to plants is a highly personal endeavor and is ultimately about cultivating joy in our lives, so you do you. If you want to pot directly into a cachepot, some plants are better candidates than others for these situations. Cacti, succulents, and some semi-succulent tropical plants such as Sansevierias (snake plants) are good candidates because they need water infrequently, which lessens the risk of making an error and overwatering.
When we pot directly into a container without drainage here at Pistils, we use small activated charcoal chips to line the bottom. Charcoal actually soaks up moisture like a sponge, unlike pebbles, and is anti-bacterial as well, filtering impurities and preventing fungal growth.
What about soil?
Repotting isn’t just about a larger pot. It’s also about refreshing the soil, so you don’t want to just transfer the old soil when you repot. Never use soil collected from outdoor areas. There’s a world of difference between rich, fluffy potting soil and the scruffy stuff in your backyard. Use a sterilized, bagged mix and keep the bag rolled tightly closed and kept in a cool, dry place to avoid attracting insects.
Another aspect of repotting to consider is different plants and their preferences in potting mixes. Some plants need special mixes to thrive, such as African Violets and carnivorous plants. Cacti and succulents require a special mix that drains quickly to mimic their native desert conditions. We mix our own cactus soil by generously mixing pumice (popcorn-like volcanic rock) into potting soil to create a loose, breathable mix that will dry quickly.
Epiphytic plants such as orchids (but also staghorn ferns, jungle cacti, philodendrons, and countless other popular houseplants) would naturally grow in the moss and leaf litter of tree branches in the rainforest, being dampened and drying out again in quick succession, so they generally prefer a mix that can absorb some moisture but still has lots of room for air.
Cactus and orchid mixes are easy to find at nurseries and garden centers (and easy to mix yourself). One part orchid mix combined with two parts potting soil is a good starting point for most epiphytic plants, although it can be a fun experiment to observe your plants and hone your own recipes.
Moisture Retention
The material a pot is made from affects plant care more than you might think, and is another element to consider when figuring out how to choose the right pot.
If you are a chronic overwaterer, it can be a good idea to buy unglazed terra cotta pots. Unglazed clay wicks moisture out of soil, and will dry out a lot faster than a plastic or glazed clay pot. These materials are not porous and so will hold moisture in the soil much longer. You might also consider mixing a little extra pumice into all of your plantings.
If you’re more likely to forget about watering your plants, keep in mind that adding pumice, orchid mix, or using terra cotta will cause your plants to dry out more quickly and need water more often. If you’re not sure where you fall on the spectrum, a moisture meter is a handy tool that can help you figure out when it’s time to water.
Rolling Up Your Sleeves
Repotting is a dirty, tender ritual that humans from all over the world have turned to every springtime for centuries. Treat it as such by choosing a day to repot when you can take your time, tune into your senses, and enjoy yourself. If you have an outdoor space, this is ideal. If it’s a shared space, remember that soil and leaf matter, though organic, can take a long time to decompose so be courteous and sweep up after yourself. If you don’t have an outdoor space, spread a tarp or newspaper across your floor where you can have some room and can easily sweep up afterwards (and you will need to—dirt has a way of getting everywhere).
Gloves are optional but a good idea since many soil mixes include woody matter that can leave tiny, irritating splinters in your hands. Now that you’ve figured out how to choose the right pot, gather your plants, pottery, and soil, because it’s time to get started!
Repotting 101
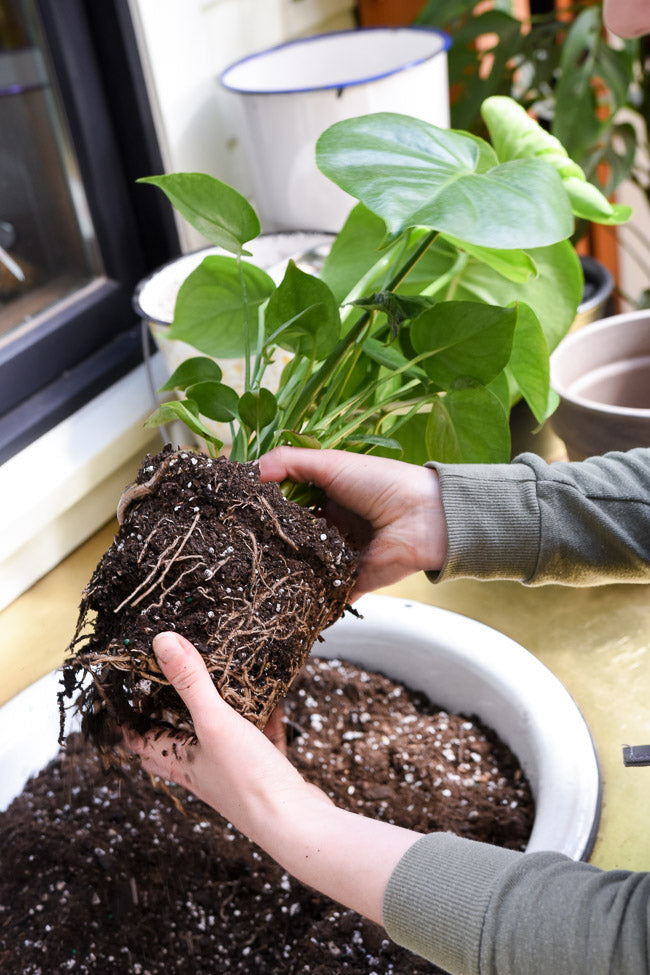
Gently teasing the old soil from the root ball when repotting improves air circulation and helps the plant grow into its new container.
First, if your new pot has a large drainage hole, consider placing a small square of burlap or cheesecloth on top to keep soil from falling out (you don’t want the weave so close that it keeps water in, so don’t use anything that could actually plug the hole). Then place a little soil at the bottom of the pot, just enough to cover the bottom.
Ease your plant out of its former pot, carefully tipping to catch it as it slides out. If it sticks, gently run a butter knife around the lip of the pot to loosen the soil. You can also gently tap the pot against a hard surface, or even enlist a friend to hold the plant while you yank on the pot. Dry soil can be particularly stubborn, so you can water to loosen it. If your plant has a thick, sturdy stem, you can gently tug as you work it out of its pot. If the plant is in a plastic nursery pot, you can gently squeeze it or, for larger plants, turn them on their sides and roll them back and forth.
But what about cacti? This might be the most daunting repotting project of all, but it’s actually not too bad once you get the hang of it. Thick leather gloves can (sometimes) protect from cactus spines but another way that works well is to wrap a cactus in an old T-shirt or towel, loosely wrapping until all spines are cushioned. You can then (using gloves for extra protection) gently lift the cactus out of the old pot and into the new. Long tweezers or tongs can be helpful for small cacti.
Once you’ve removed your plant, gently tease old soil from the roots. You want to use a light touch, but needn’t be too afraid of doing harm. Look closely to observe the health of the roots and the quality of the soil. If any roots fall off, don’t panic. A few dead roots is normal but a lot might mean that your plant has seen some hard times. A dead root will be slimy (usually a fungal issue or overwatering) or brittle and popcorn-like (usually underwatering). If your plant has a tiny root ball, consider keeping it in the same pot or even going down a pot size; you really only want a few inches of soil surrounding the roots.
Place the plant inside the new container, either holding gently by the stem or root ball in the position you would like. You want the soil level to be the same as it was previously, so if the plant is sitting too far down in the pot, keep adding soil a small handful at a time, making a little divot in the center for the roots. If the plant is sitting up too tall, remove a little until it’s just right. Then gently fill in the sides of the pot with soil until there are no air pockets.
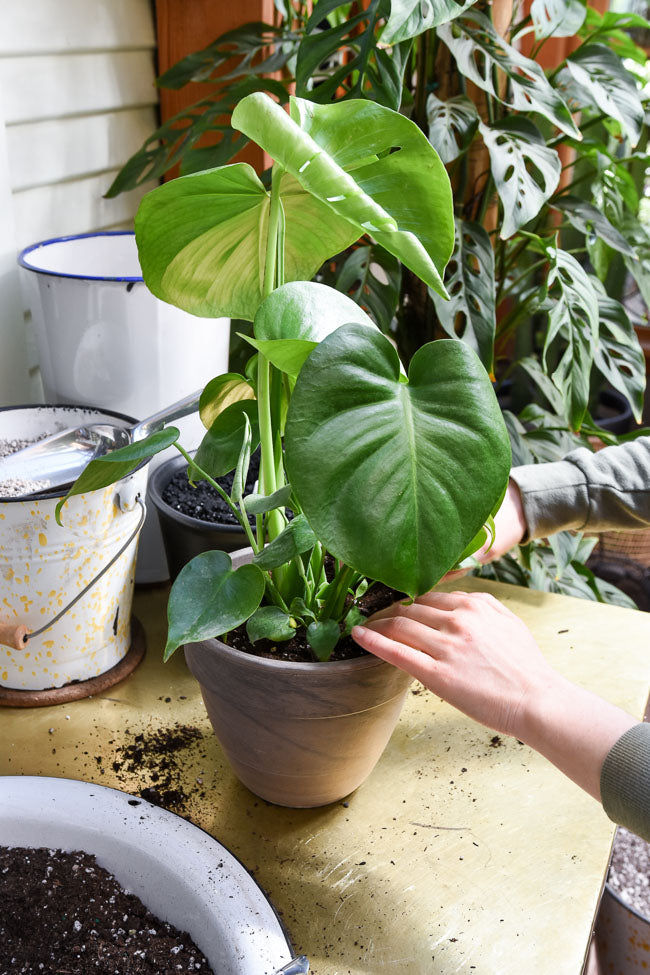
This Monstera deliciosa – Swiss Cheese Plant has been perfectly potted into its new container. Tamping the soil gently helps to remove any lingering air pockets in the soil.
You never want to push down on the soil, as this can damage roots, but you can gently gather soil around stems and very lightly tamp it down with your fingertips to anchor your plant. You’ll want to leave a little room on top of the soil for water to pool, otherwise it will quickly overflow and cause a mess. You can add a little water to settle the soil if your plant likes moisture, but for many the moisture in the new soil is hydrating enough to start.
There’s usually a little fertilizer included in most potting mixes, so wait at least a month before adding more. You can finish by adding a thin layer of decorative rock to the surface if you like, or leave it bare so you can feel and examine the soil.
If you can’t seem to get the soil level right or something else is hampering your efforts, don’t give up. It’s okay to put your bare root plant gently on its side and take a breather. Spatial reasoning isn’t always easy; even the most skilled gardeners sometimes misjudge and need to add and subtract soil or start all over again, so don’t mutter about your black thumb if it doesn’t work out the first time. If you’re still hesitant or are faced with a particularly intimidating repotting project, call a friend who’s good with plants or reach out to your local nursery. Many nurseries, like Pistils, offer a potting service and are happy to walk you through the process or offer advice.
We hope this guide empowers you to take your plant care into your own hands, confidently knowing how to choose the right pot for your plants with curiosity and a sense of adventure. Repotting doesn’t have to be an ordeal. In fact, it could become one of your favorite springtime traditions. It’s certainly one of ours.

Comments
Patrick said:
Love this article, very helpful and easy to read.
Lynelle said:
Wow. What a great article! Well written and full of good information!
Jacqueline said:
AWESOME right on time article! I have 51 houseplants and have been repotting most of them the last 3 days…hey Its fun and its keeping me busy during this Pandemic:)
Ed Chalfont said:
I am wondering if certain plants require a different height pot than others. For example, many snake plants from nurseries come in grower pots and the height of the pot is almost the width of the pot. With this in mind does it make sense to consider height? I’m thinking that too high a pot may not be good for certain plants.
Does this make any sense?
Lori said:
Fantastic guide! I learned a lot.
Allan said:
great information. you brought your information down to my level understanding. Many articles assume a base level of knowledge. You explained everything, Thanks